Thursday 17 April 2014

Braiding tutorial


So today should be the next part of my sew along unfortunately I've had a week from hell and not been able to do it shame on me but I hope to win favour by bringing you a new tutorial.
 I started to write this  on the train going to a gig, Delain and Within Temptation \m/,  accompanying me is my 7 year old daughter. It struck me that my old band long sleeve could be adapted to somehow fit her.
After some thinking I thought I would braid down the back well it worked better then I could of thought fits a dream and as you can see it looks totally cute.


So I bring you how to make a braided top.
Equipment
T-shirt (must be bigger then required)

needle and thread
Something to cut fabric (craft knife or rotary cutter will work well)
Cutting mat
Glue dots (not essential)
ruler
crochet hook if doing smaller braids
iron and starch
This gives instructions to make a double braided top. To make a single braid down the middle I will let you know the steps to skip.
 First fold your top in half down the middle seam to seam, starch and press well. 


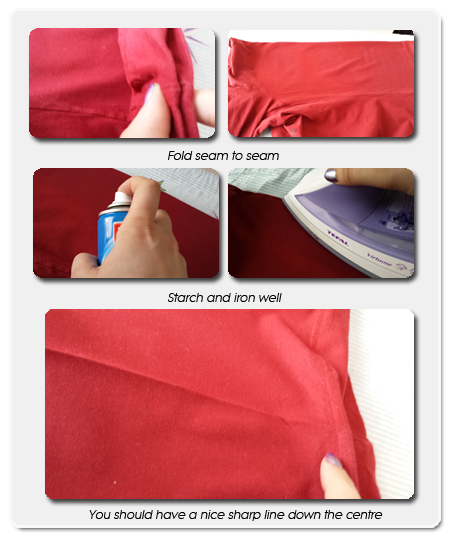
Now you should have a nice sharp line down the middle

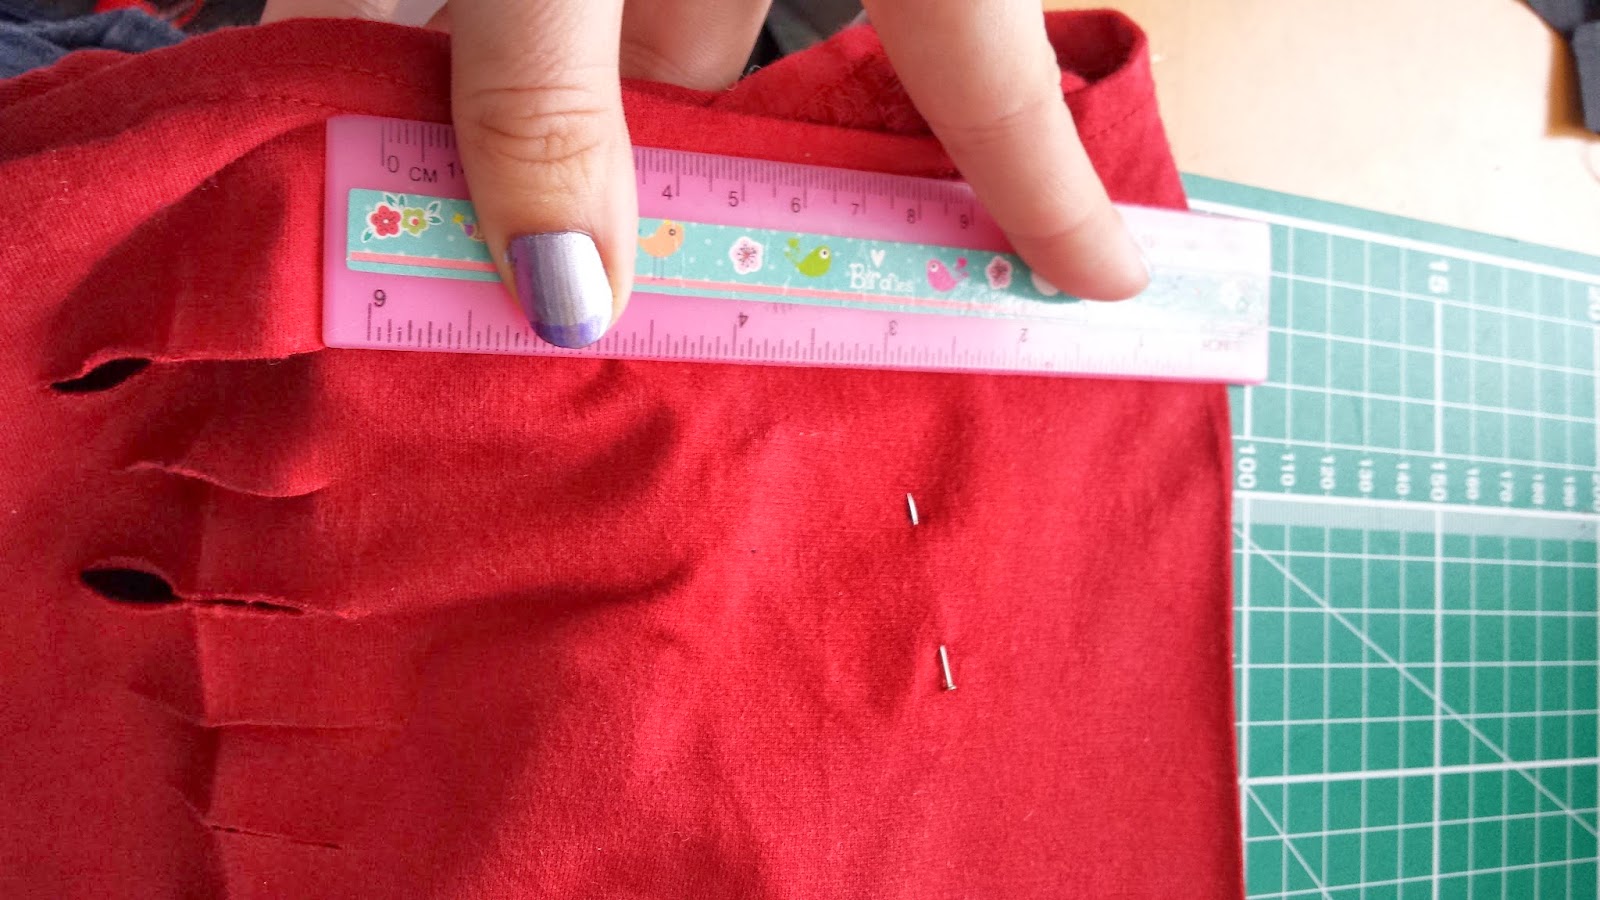
If doing a single row you're ready for cutting leave the shirt folded in the middle bit ensure you only have the side your cutting folded place a couple of pins to ensure the fabric doesn't shift.
If doing double then fold one underarm seam to the centre fold and press well repeat for the other side, you may wish to repeat the fold on the other side after you have cut if easier.

Next is to place the top on a cutting mat, I placed some glue dots on the mat to help stop it slipping but if you put anything on the mat make sure it is safe to use with your fabric. 


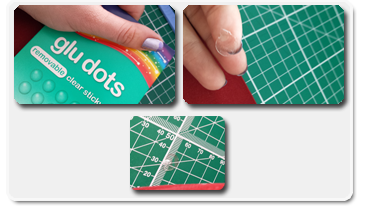
Line the fabric up with a line to start from and decide how big you want the braid, I was 2 squares along well near enough and 1 inch deep, this makes a 2 inch cut. 
Using a ruler or other hard straight edge cut carefully. I started with a craft knife but found a rotary cutter easier in the end.  Alternatively you could draw your marks on with tailors chalk and use scissors. 

Repeat on the other side.


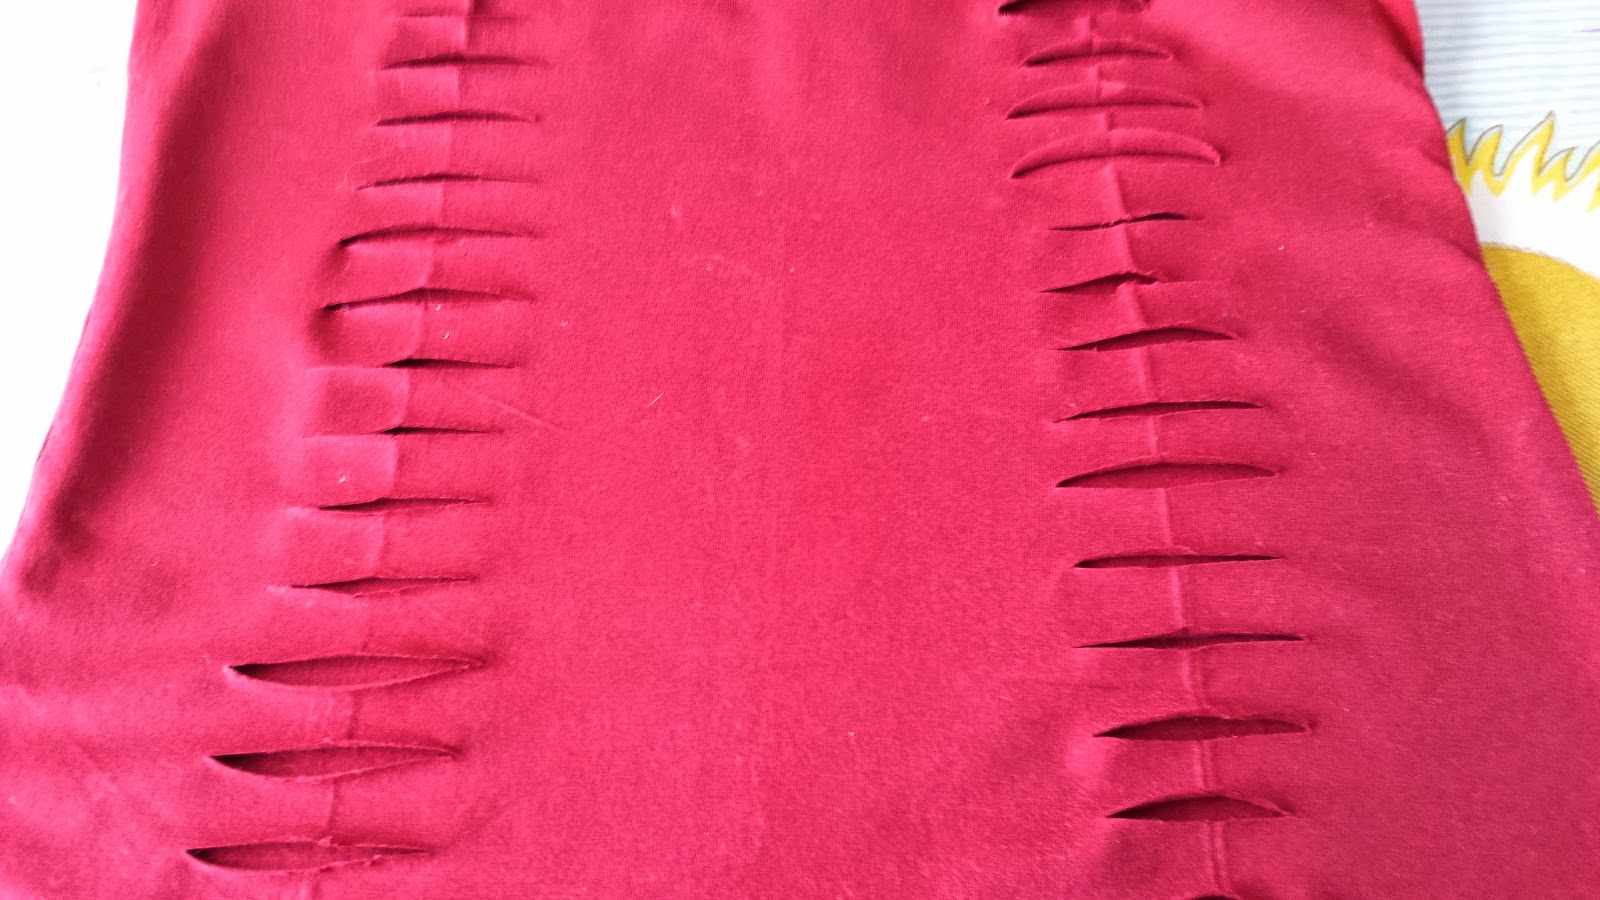
Now you're ready for braiding


To braid it your going from the second to top piece and bringing it up and over the top one.
This leaves a little loop from the piece you just brought up, you're going to bring the next one down up and through that loop, making a new loop bring the next one through that one and repeat till you reach the bottom.

On the back where it was quite big I found it fine using my fingers but on the sleeves where I had much smaller slits I couldn't use my fingers so I used a 6mm crochet hook.

When you reach the bottom secure it with a quick hand stitch.
Repeat on the other side and then take it to the machine and go over your hand stitch to ensure it is very secure.


As you weave it through the loops it makes a braid

I then topped it off at the top with a small bow as I found the gap a bit too big. You can sew the big gap up, embellish it or leave it as it!

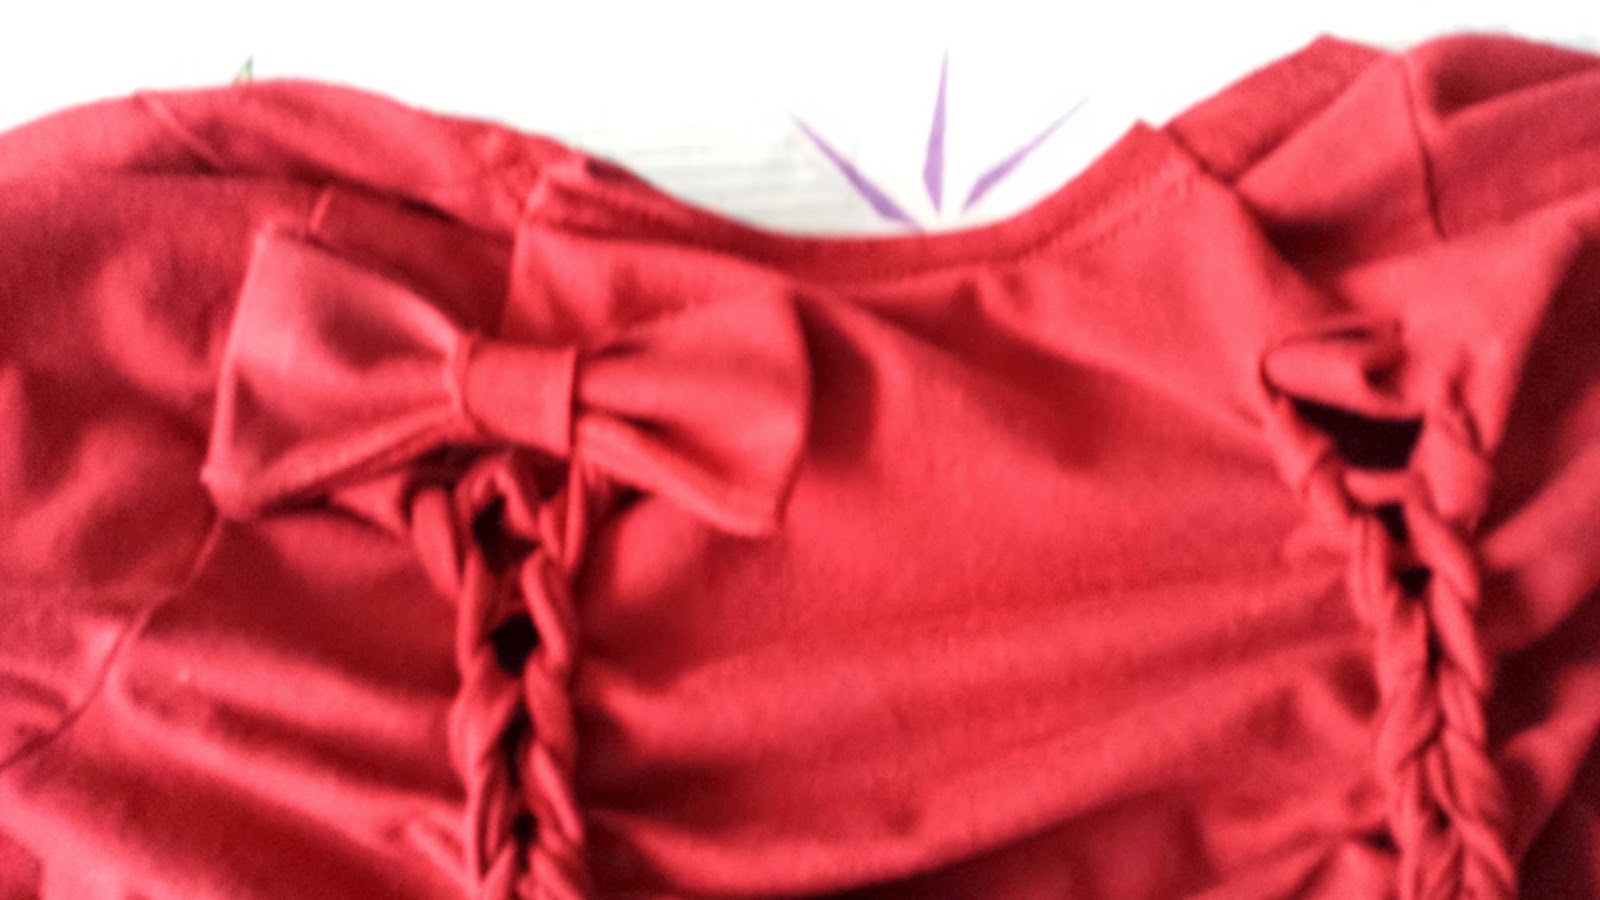
I embellished it with Bows at the top

Forget-me-knot
Louisa


Don't forget to leave a comment!

Friday 4 April 2014

Sew a Long - Week One

Welcome to the first part of my basic's Sew Along, for this I wanted to focus on my own personal sewing issue ZIPS.


Zips, zips, zips I don't go a day where I don't touch atleast one, if it's not on my own clothes then on the childrens clothes, my eldests pencil case, their coats so many zips.
Most people prefer to use them instead of buttons as buttons can be time consuming, I hate putting them on things, my previous tries at zips have gone horribly wrong so I gave up. I have quite a stash of them, ironicly none in the size I need, but I just avoid them.

This is my first tutorial so it may be a bit rough around the edges.
Equipment needed
  • Zipper foot
  • Zip
  • Fabric 
  • Pins or needle and thread (if hand tacking)

Skills needed

You need to be able preform a straight stitch.

First think you will need is a Zipper foot this allows you to sew closer to the zip it should looks a bit like this one. You will see it has a bar separated by a middle post this allows you to attach is on either side for sewing.


Universal Zipper foot for Low Shank machines
Underside of a regular Zipper foot
In this tutorial I pinned the zip to my fabric simply because the instructions I was following for the coin purse said to but it would be much to easier to hand tack it in place.
Secure the zip to the right side of the fabric. If your fabric frays easily then you will want
either overlock or zig-zag stitch the edge first.


Start with a securing stitch, sew steadily along with a straight stitch, till the end and finish with another securing stitch.


You then fold it back and you want to press it at a tempreture sutible for your fabric.


You're then pinning (or hand tacking) the other side in the same way and repeating on the other side.


Again fold back and press again so the fabric stays nicely at either side of the zip and VOILÀ you have attached a zip!

Now if your accomplished at doing a basic zip there is plenty more versions to play with you can do lapped zips, mu husband currently likes that term as he has learnt it watching the Great British Sewing Bee, it's that and Sweetheart necklines, fly zippers and if you have the right foot you can do an invisible zip, there is tutorials on this on youtube with a regular zip foot.

You can also try on a variety of projects using them as decoration.

I have seen pencil cases and bags made purely from zips so its not as plain and boring as it seems.

Now I hand this over to you lot.

I am really interested to see what other people can do so please share with me your attempts even if they go wrong.
You can share with me via 
Instagram: with #knottednelly and tag me @insonstis  
Twitter: #knottednelly and @Disabledmum
Facebook: https://www.facebook.com/knotonyournelly 
or via your personal blog and letting me know in the comments...

If your taking part from your blog please let me know so I can add you to the list this helps me to view people taking part and see what you are making go here to see how to take part from your blog 

Forget-me-knot
Louisa


Don't forget to leave a comment!

Thursday 3 April 2014

I love sewing but...

I love sewing but being a mummy of a Brownie ( or Girl Scout for American followers) can really push you sometimes. 


It's not that I dislike sewing on my kids patches, in fact once your done that sense of pride that your kids earnt that badge and now she can wear it and everyone can see what she achieved.

But as I am sewing tags into her clothes for pack holiday which she leaves for in days my machine has a hissy fit the bobbin casing does something.
Something which hours of seemingly repetitive in outing suddenly fixes, even though I didn't do anything different to the first time, I then in my over stressed state put the needle, which I have to change because it broke during the bobbin fiasco, in backwards and by the time I've figured that out its time for bed, my bad back is now in spasm and I've still loads to sew...
It can almost make me loose the will to sew...


I wonder what almost makes you loose the will to sew?
                                                             Forget-me-knot
                                                                   Louisa


Don't forget to leave a comment!

Wednesday 2 April 2014

Introduction to the Basic skills Sew-A-long

The first part of the Sew-A-Long goes up very very soon, talking like days.
What I wanted to do was to bring a wee introduction.

So first a wee list of what we will be looking at I have tried to cover most of the things which if your going to sew you will come across at some point.
As someone who personally has sewn for a while I find some of the things I know how to do but I avoid because I found them a pain in the arse. I know practice makes perfect, I know those things you find annoying, fiddly and difficult to do with practice become easy.

What I really hope is to see more accomplished sewers taking a more advanced look at the basics and showing us all how to really take it forward.

For most of these things you wont need any real equipment I will at the start of each part clearly what you will need if anything.

You do need to know how to do a basic stitch either forward stitch on your sewing machine or to be able to do a running stitch by hand.

So we will look at; 
  • Zips (You may prefer to buy a zipper foot for your machine if it does not come with one)
  • Buttons 
  • Binding 
  • Shirring (You will need shirring elastic)
  • Gathering
  • Appliqué
  • Facings*
  • Pleats 
  • Darts
  • Collars
  • Cuffs*
  • Piping (You will need piping cord and may prefer to purchase a piping foot for your machine)
*indicates you will need interfacing to suit your fabric
On the list below I have not put what you need if obvious (ala zips/buttons)

Someone asked me how they can follow as they were not very savvy on this if you have a google+ account you can click the connect button on the right hand side

You can follow me on the following
Twitter: #knottednelly and @Disabledmum
Facebook: https://www.facebook.com/knotonyournelly 

I will also try and pop pictures on Instagram: with #knottednelly and you can add me @insonstis  

And failing all else just book mark the blog and check back often

I will get at least one part up a week so check back at least that often though I hope to get up ideas and my attempts during the week even if they have gone wrong, after all we all make mistakes its how we learn.

So that's all for today but please check back in a couple of days for part one.

Forget-me-knot
Louisa


Don't forget to leave a comment!